Step 4: Click the Download button to save the video
Step 5: Share the video file to social media or attach to an email
Step-by-Step
Desktop
Step 1: Once you’ve downloaded your social media video/post, you’ll want to go to your social media account to share with your clients and potential buyers.
Facebook
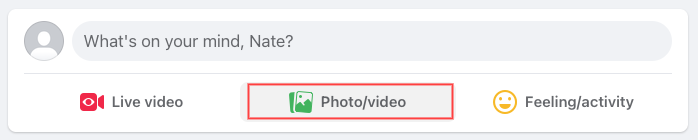
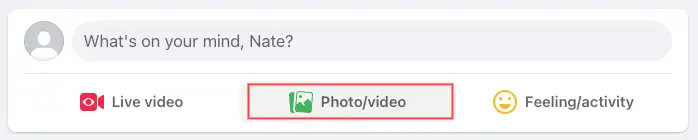
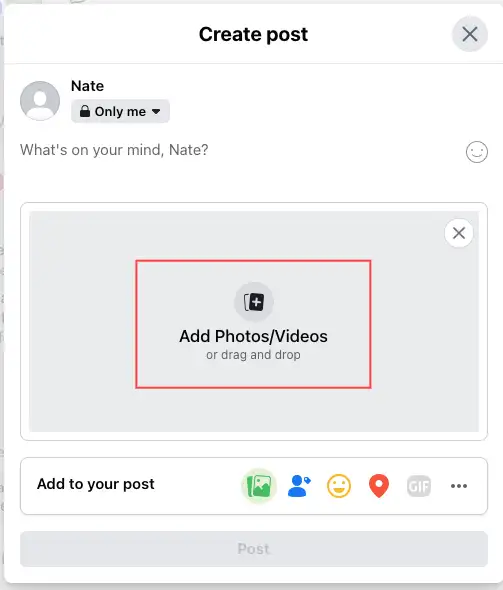
From your Facebook homepage, click ‘Photo/video’ under ‘What’s on your mind?’
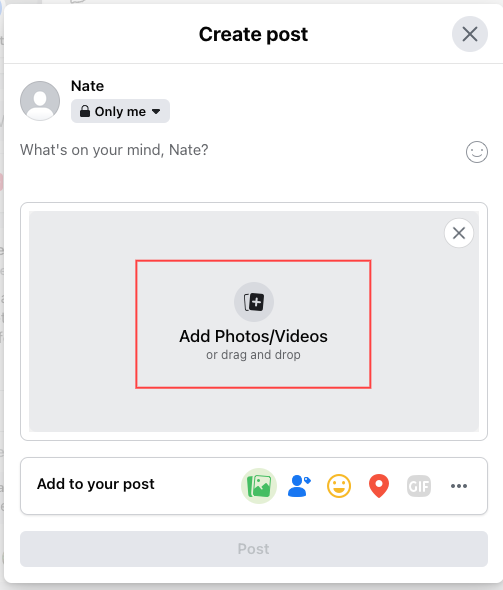
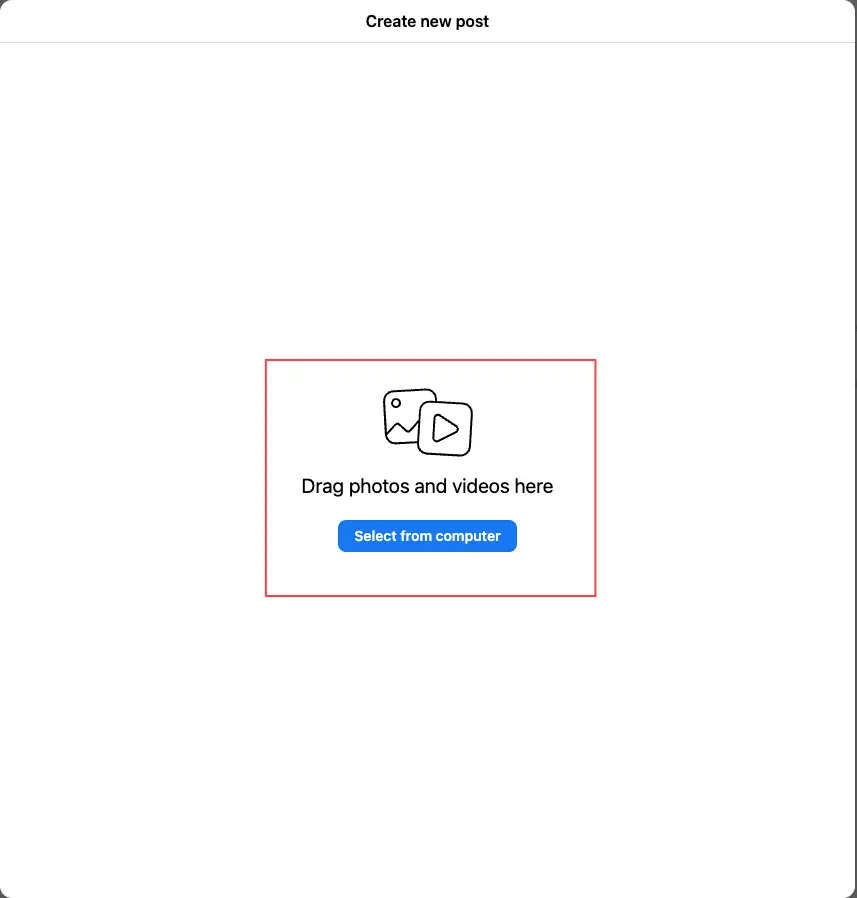
Click on ‘Add Photos/Videos’ to open the video file you’ve saved. Write in a personalized caption and select ‘Post’ when you’re ready to share.
Instagram
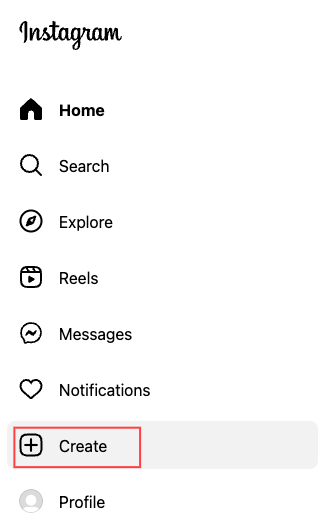
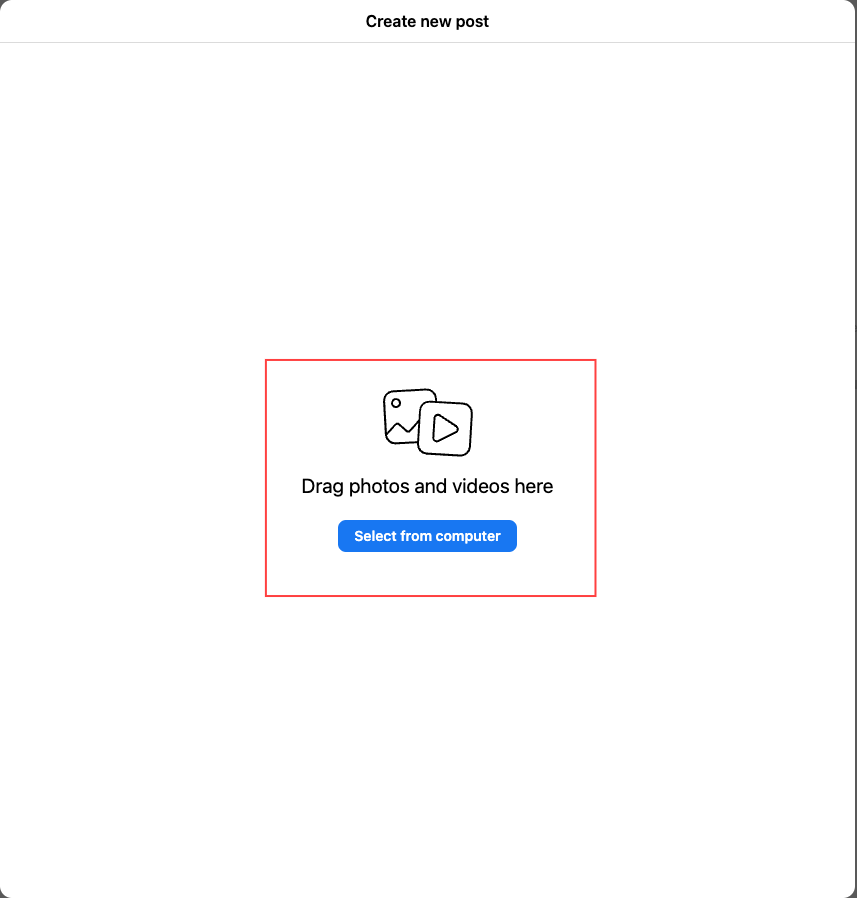
From your Instagram homepage, select ‘Create’ or the plus icon.
Click on ‘Select from computer’ to open the video file you’ve saved. Write in a personalized caption and select ‘Post’ when you’re ready to share.
Mobile Device
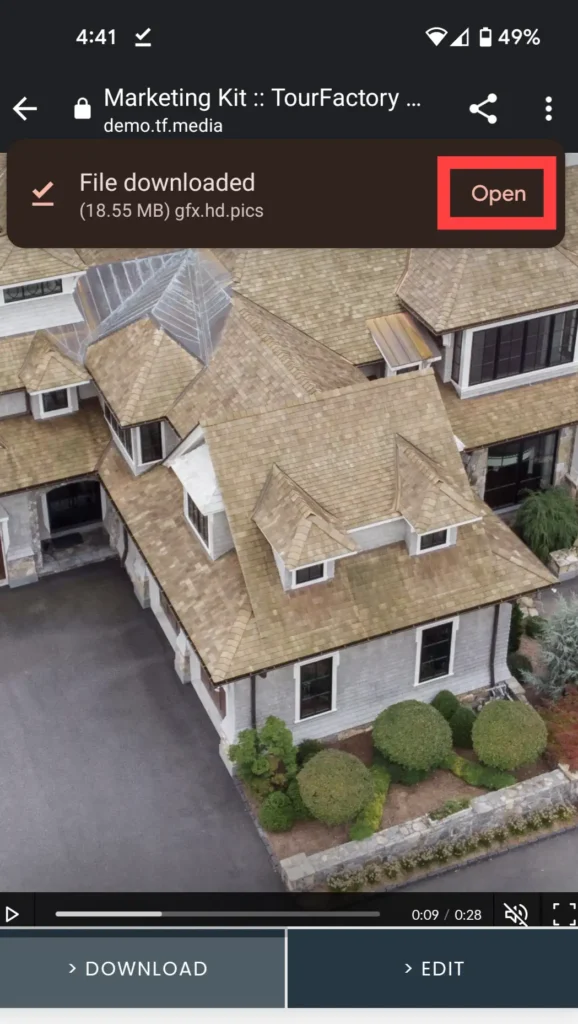
Step 1: After the download finishes, the file will be available on the mobile device to share. See Apple and Andriod examples below on how to access the download:
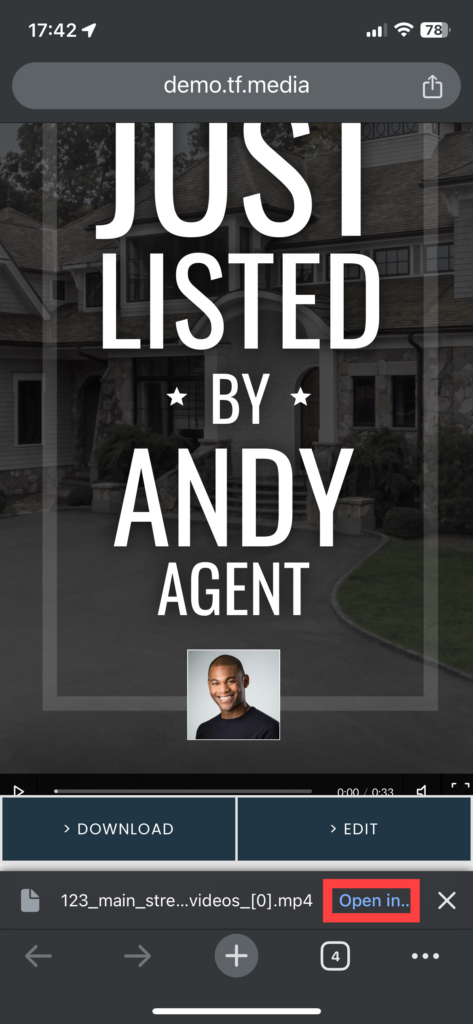
Apple – Downloaded Files *On Chrome browser
After the download finishes, a banner will display at the bottom of the screen. Click ‘Download’ link.
Then click the ‘Open in…’ link.
Share directly from the menu below to post to social media or attach to an email.
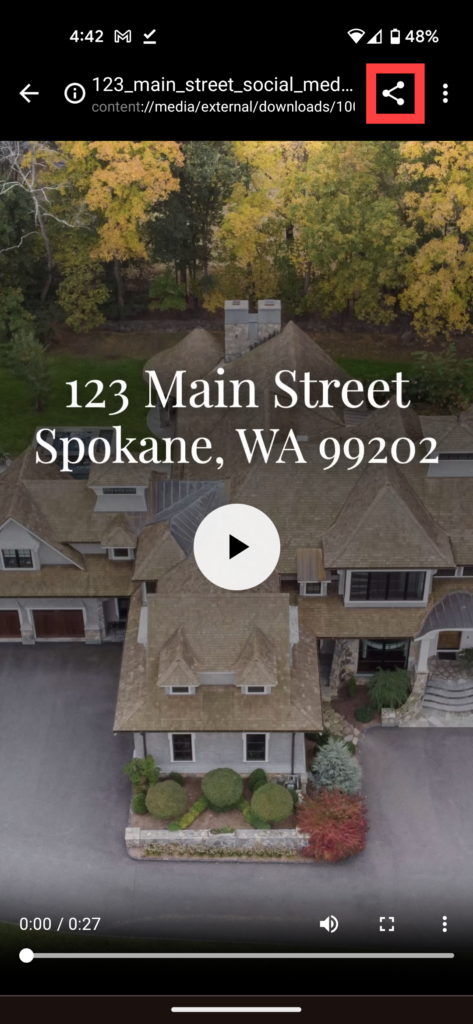
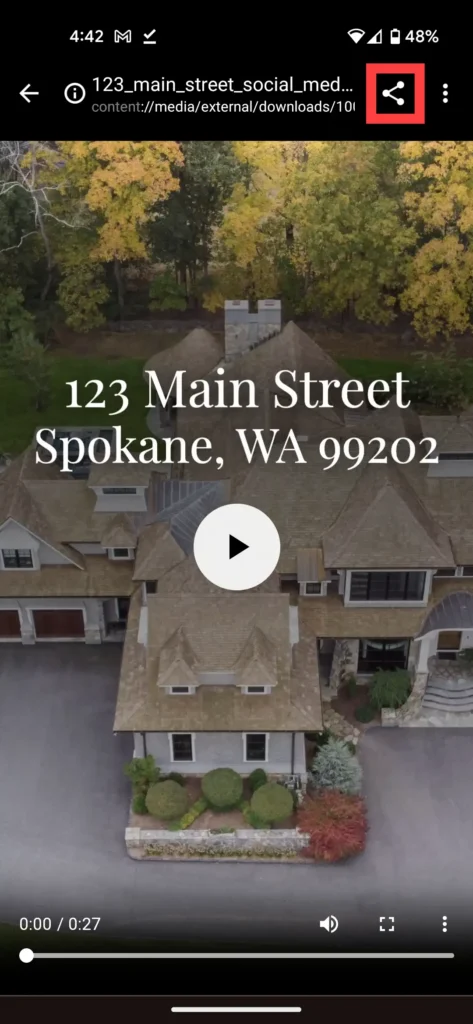
Android – Downloaded Files *On Chrome browser
After the download finishes, a banner will appear near the top of the screen. Select ‘Open.’
The video will open and you can select the Share icon to post to social media or attach to an email.
Related Content
Choosing a Social Share Image
Social Media
How to Choose a Social Share Image Step 1: Go to Site Summary Step 2: Click the Marketing Kit tab Step 3: Scroll to the Social Media Flyer Tiles section…
Setting a Default Social Share Image You and your client can choose which image you would like displayed when your property website link is shared on social media. If you…
Step 1: Go to the Site Summary Step 2: Click the Marketing Kit tab Step 3: Scroll down to the Social Media Videos Step 4: Choose tile and click “Edit” Step 5: Make changes, if needed Step 6: Click “Save & Close” Step 7: Click “Download”
See the Table of Contents on the right-hand side and click for Frequently Asked Questions.
View the video below for a quick how-to overview:
Step-by-Step
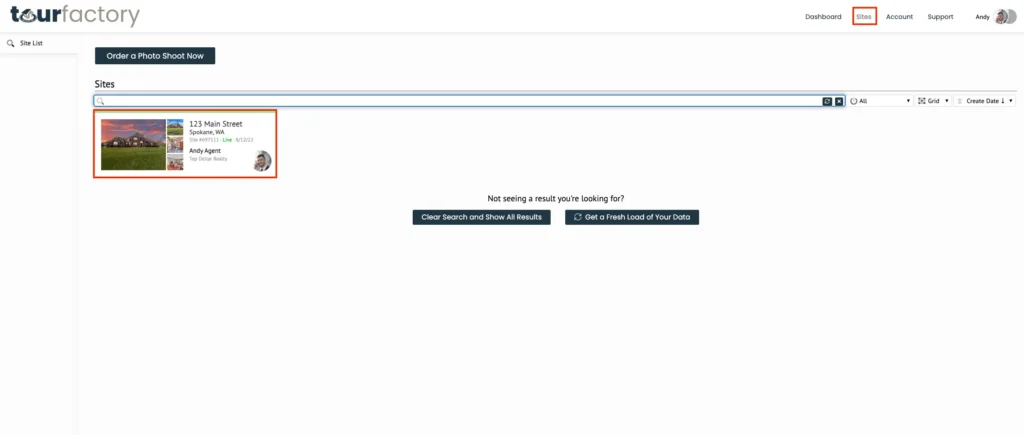
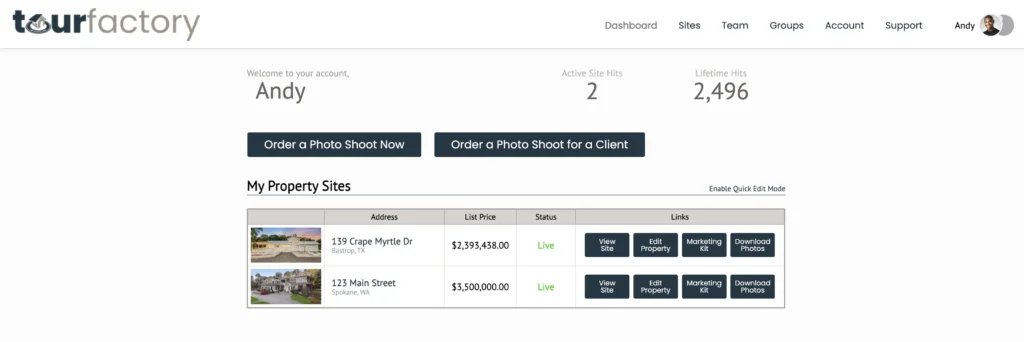
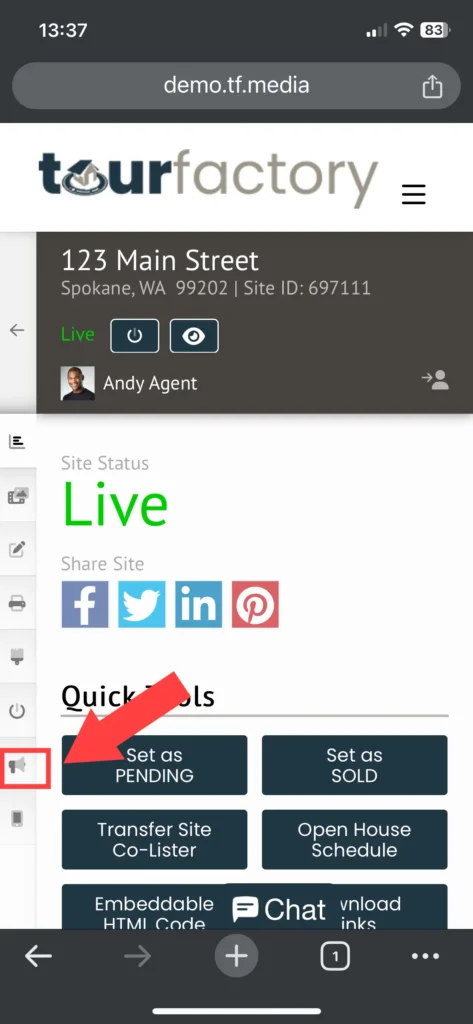
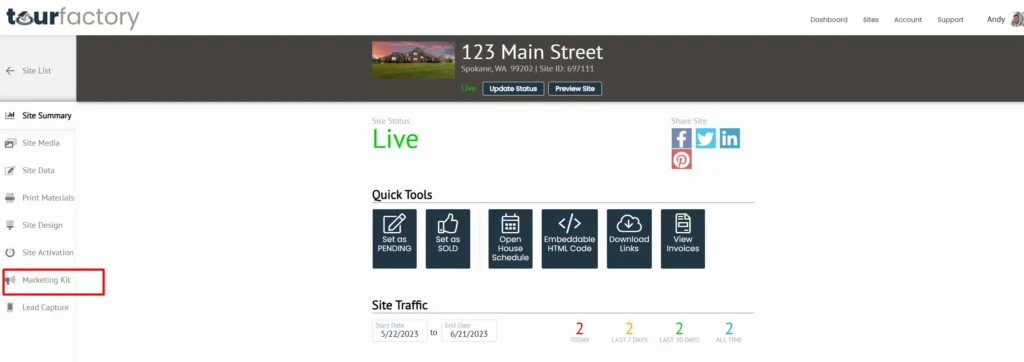
Step 1: From the Site tab at the top of the page, click the property that you would like to access the social tiles for. This will take you to the Site Summary page.
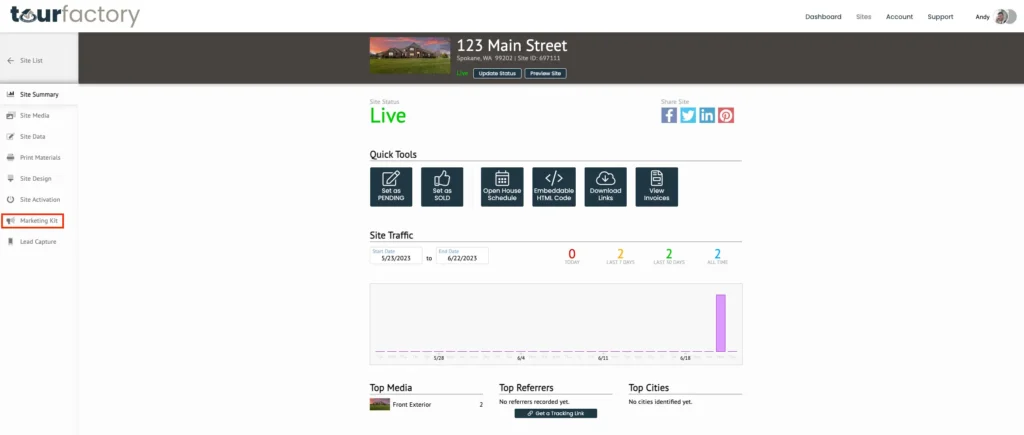
Step 2: Click the Marketing Kit tab on the left-hand side.
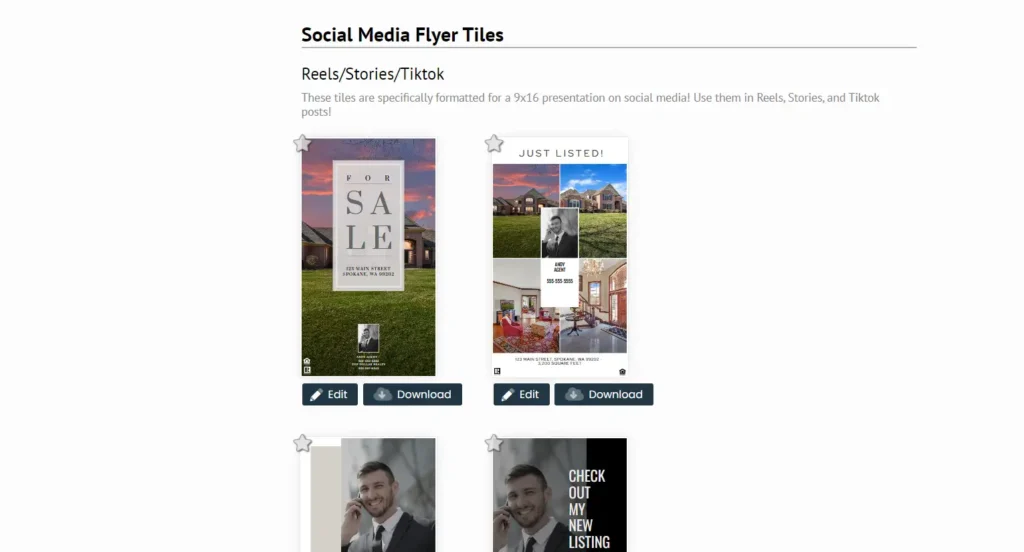
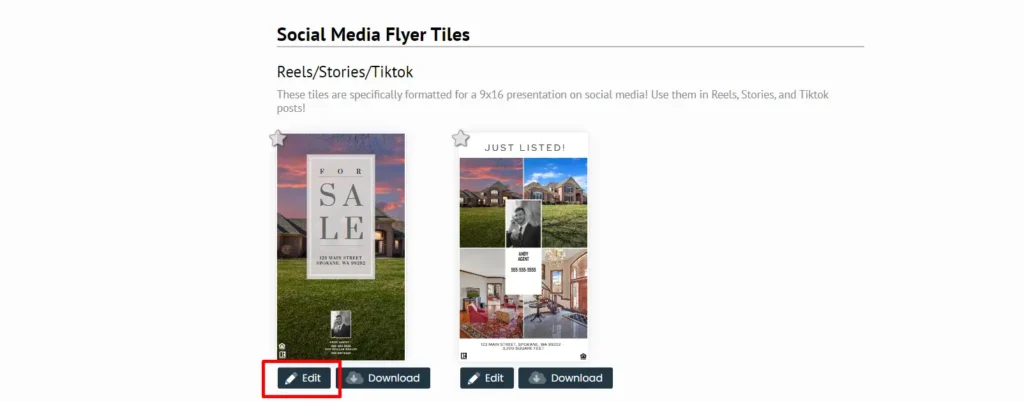
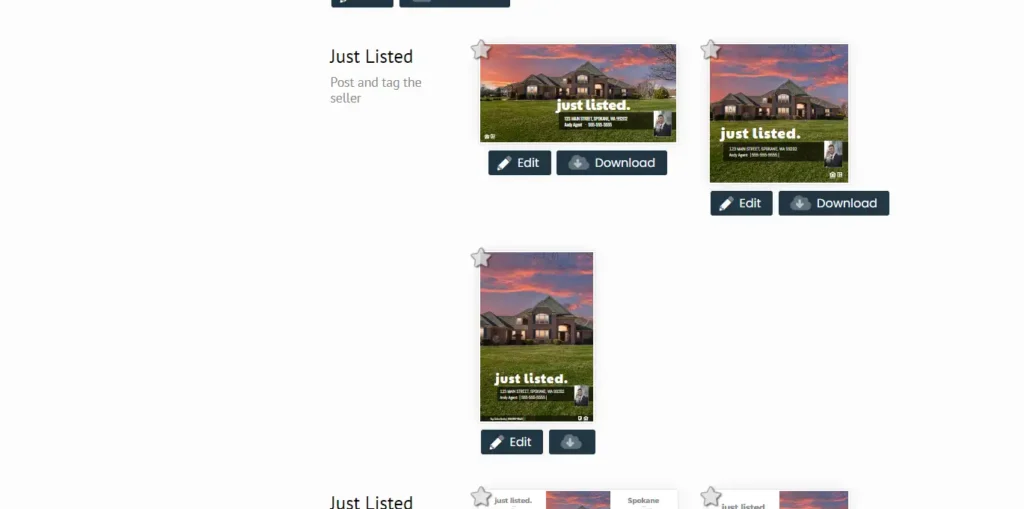
Step 3: Scroll down to the Social Media Flyer Tiles section.
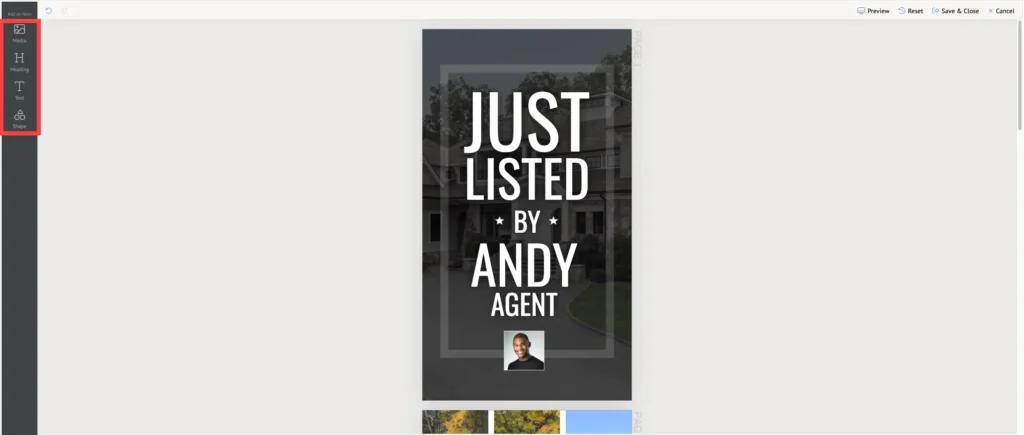
Step 4: Choose the social tile to fit your needs; here we’re showing a Social Media Flyer Tile for Reels/Stories/TikTok. Click the “Edit” button for your desired tile.
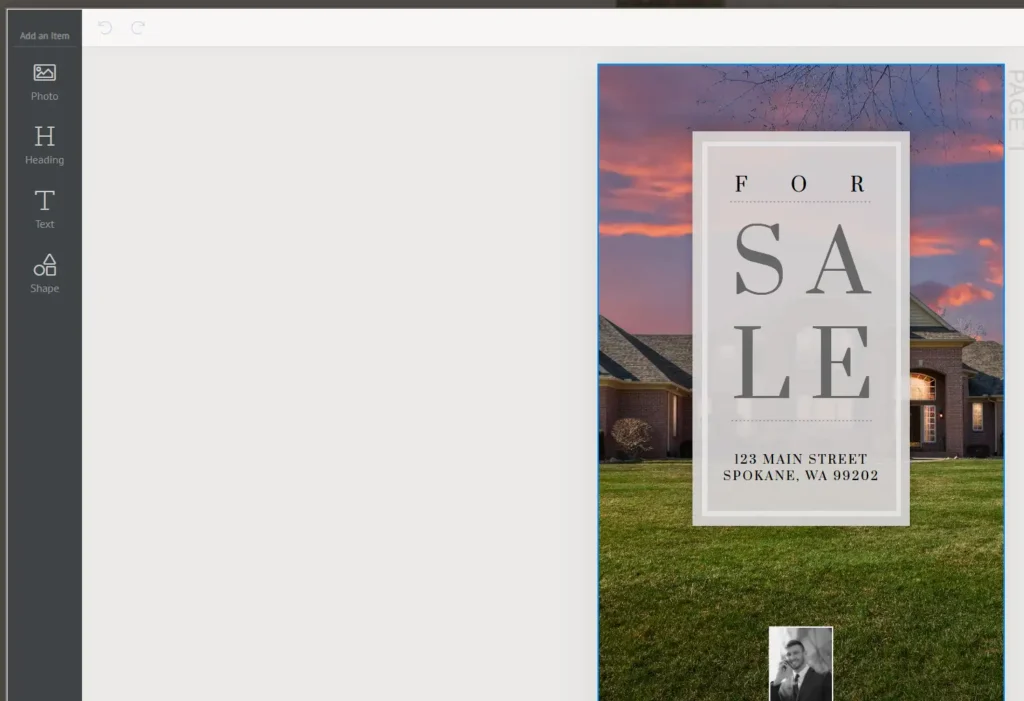
Step 5: Depending on the social tile that you have selected, make the changes you desire to customize it. These include the headline, address, photos, fonts, colors, and agent information.
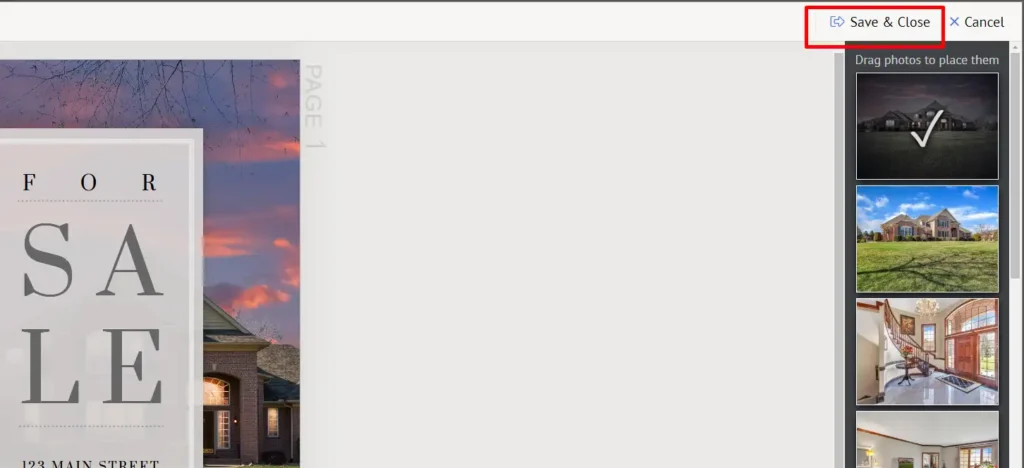
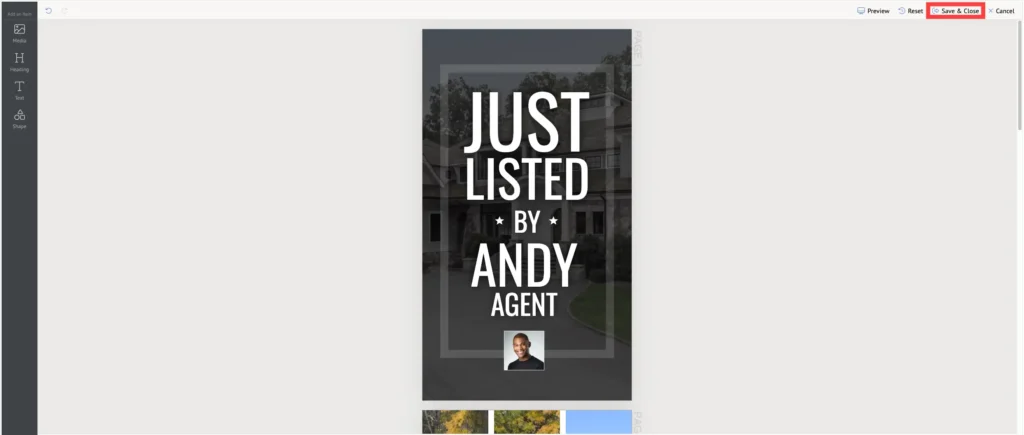
Step 6: Once you have made your changes, click the “Save & Close” button.
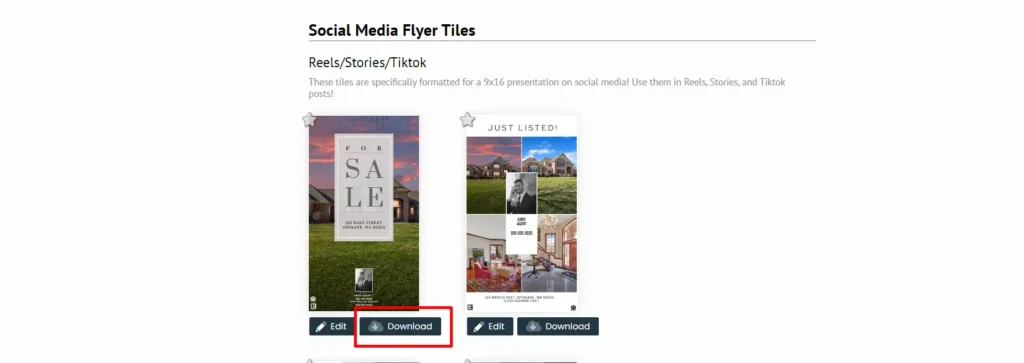
Step 7: Then, click the “Download” button for that social tile to save it to your device. From there, you can share it on your various social media platforms.
Social Media Flyer Tiles FAQs
What does starring a social media tile do?
Starring a tile changes the default image when you share your site link to your social media from the Site Activation tab. For more details, check out our Choosing a Social Share Image article.
How does starring photos affect my Social Media Flyer Tiles?
When you star photos in the site media section, those images will pre-populate into the top images on the tiles. You can edit the photos in a tile if you prefer to star a photo for your teaser Site Video, but would like to have a different image for your tiles.
How many of my photos will appear in the Tiles?
Each template is different! Preview the template to see how many appear.
Can I create a customized tile template from scratch?
While your social media tiles are high customizable (i.e. you can change the photos, fonts, colors, text), you are unable to create a new flyer tile template from scratch. We suggest adding to our ready-made templates to create one-of-a-kind tiles.
Related Content
Choosing a Social Share Image
Social Media
How to Choose a Social Share Image Step 1: Go to Site Summary Step 2: Click the Marketing Kit tab Step 3: Scroll to the Social Media Flyer Tiles section…
Setting a Default Social Share Image You and your client can choose which image you would like displayed when your property website link is shared on social media. If you…
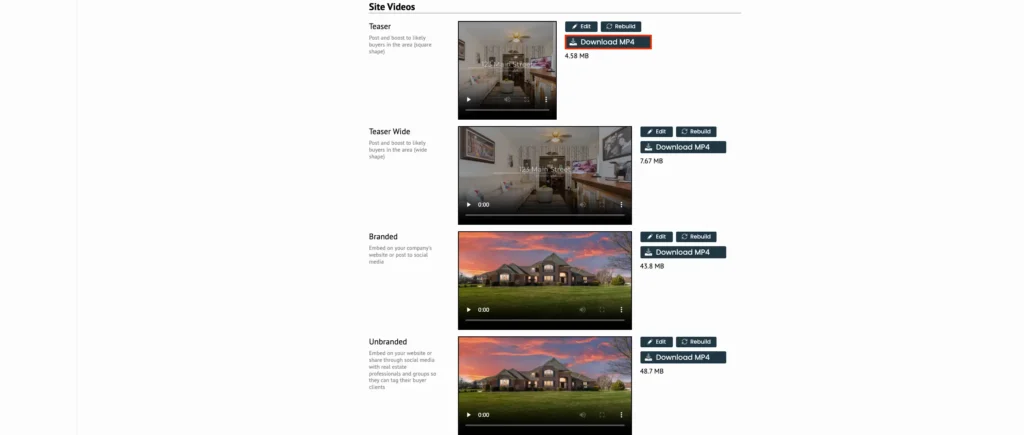
When you purchase a Marketing Kit, you will receive branded and unbranded videos for your listing, as well as, short teaser videos that are ideal for social media. The videos can be downloaded and then embedded in a MP4 format.
How to Access your Site Videos
Step 1: Go to the Site Summary
Step 2: Click the Marketing Kit tab
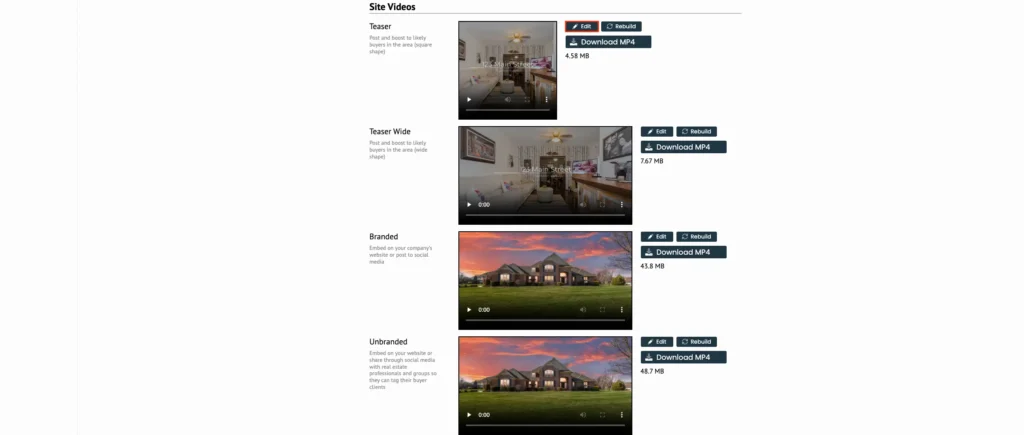
Step 3: Scroll down to the Site Videos section
Step 4: Click “Edit” button to make changes, if needed
Step 5: Click “Rebuild”, if changes are made
Step 6: Click “Download MP4”
See the Table of Contents on the right-hand side and click for Frequently Asked Questions.
View the video below for a quick how-to overview:
Step-by-Step:
Step 1: From the Sites tab at the top of the page, click the property that you would like to access the Site Videos for. This will take you to the Site Summary page.
Step 2: Click on the Marketing Kit tab on the left-hand side of the page.
Step 3: Scroll down to the Site Videos section to see the Teaser, Branded, and Unbranded videos.
Step 4: If you need to make any changes to the video,, click the “Edit” button. Make your changes and then click “Save Updates”.
Note: Changes include hiding/changing property information and selecting which media type to display (i.e. photos only, photos and videos, or video only).
Step 5: If you have chosen to make changes, the video should automatically rebuild and you’ll see a message saying to check back and refresh the page. If you don’t see this message you can manually refresh the video by hitting the “Rebuild”. Note: Rebuild takes between 20 minutes to 1 hour to complete. In some rare cases, it may take up to 24 hours.
Step 6: Once the rebuild is complete, click the “Download MP4” button. You can then share the video out however you desire.
Site Video FAQs
What is the difference between Teaser videos vs Branded/Unbranded videos?
Teaser videos take your first few or favorited photos on the listing and makes them into a short video that runs about 30 seconds, and are good for giving a brief look at the property.
The branded and unbranded videos can use all your photos and other media like video walk-throughs, and make them into a longer full length slideshow that can run for multiple minutes for a more in-depth look into the property.
Do Site Videos automatically generate after activation?
Yes, once your Property Site is activated your Site Videos will automatically be created.
Do Site Videos automatically rebuild after I make updates like adding music, rearranging photo order, etc?
Yes! You’ll see a message stating the rebuild process has started.
Will I receive an email when my video has been rebuilt?
No, an email will not be sent once the rebuild is completed. To see if your video is finished, refresh the Marketing Kit page.
How long does a video take to be rebuilt?
It can take between 20 minutes to 1 hour to rebuild a video. In some rare cases, it may take up to 24 hours.
How does starring photos affect my Site Videos?
When you star a photo or video in the site media section, it will appear first in the teaser videos. Starring will not change the order of the branded/unbranded videos.
Are all the pictures/videos in the site media section included in the videos?
All pictures and videos that have not been hidden are included in the videos. By editing the Media Options of the Site Video, you can change which media type will be used (i.e. photos only, photos and videos, or videos only).
Can I change the speed of the photo transitions?
No, this feature is not available for Site Videos.
Why does my video not have sound?
Background music is connected to the music selected for your Property Site (under the Site Design tab). If you have not added music to your site, you will not have sound on your Site Video. To learn how to add/change music, check out our Adding Music article.
What site settings will appear on my videos?
Both teaser and longer format videos: – Address – Website URL – Photos and videos in site media section
Branded longer format video: – Bedroom and bathroom count – Square footage – Price – Agent name, agent headshot, agent phone number/email, company logo
My unbranded video contains a link to my branded tour, can this be changed?
Yes, click “Edit” and then go to the “Web Address” field. Update it to the unbranded link or hide it.
Can my co-lister appear on my video?
Sorry we don’t currently have the ability to display multiple agents on the videos.
Related Content
Choosing a Social Share Image
Social Media
How to Choose a Social Share Image Step 1: Go to Site Summary Step 2: Click the Marketing Kit tab Step 3: Scroll to the Social Media Flyer Tiles section…
Setting a Default Social Share Image You and your client can choose which image you would like displayed when your property website link is shared on social media. If you…
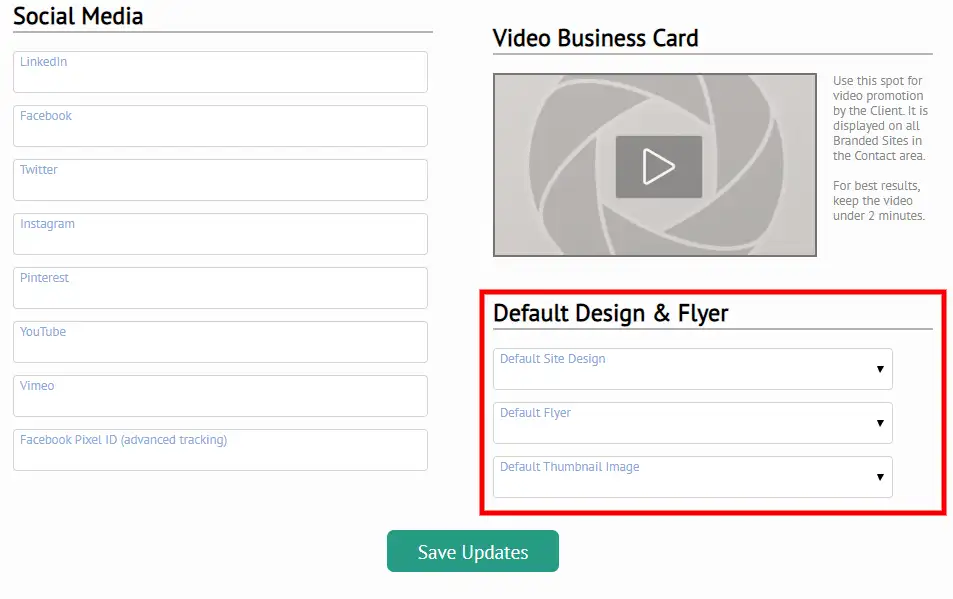
You and your client can choose which image you would like displayed when your property website link is shared on social media. If you or your client want to be sure that the same image is used each time for every property, you can set a default on their account. This will save you both time as you wont have to do this for every single property!
Click the steps below for a detailed walk-through:
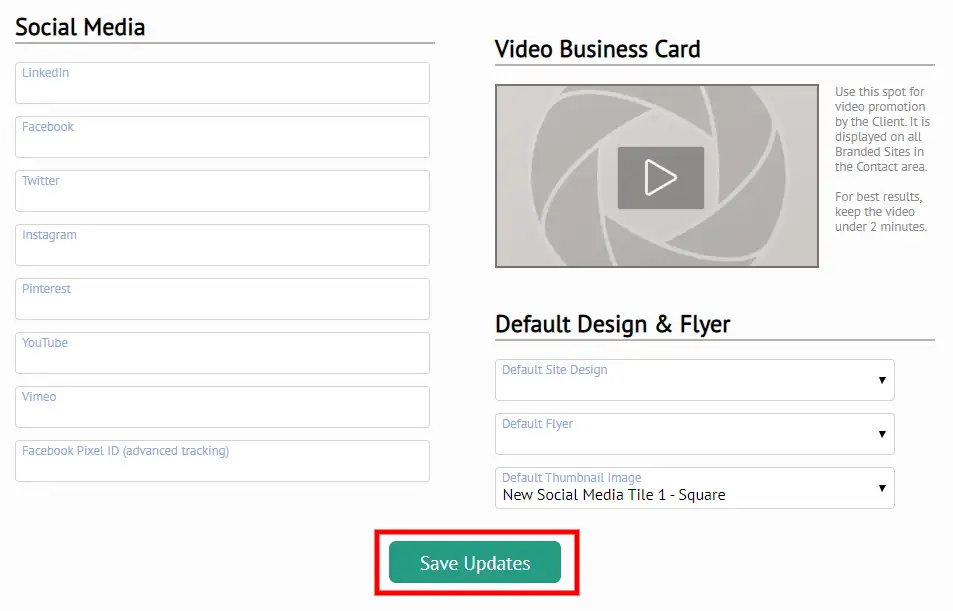
Step 1: Click on “Account” in the top right corner of the screen.
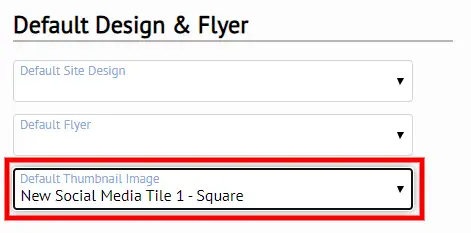
Step 2: Scroll to Default Design & Flyer section
Step 3: Choose Default Thumbnail Image
Step 4: Click “Save Updates”
Step-by-step:
Step 1: Click on “Account” in the top right corner of the screen.
Step 2: Scroll down to the Default Design & Flyer section.
Step 3: Click the drop-down menu for the Default Thumbnail Image and select your desired social tile.
Step 4: Click “Save Updates” to save the default image for social sharing.
Related Content
Choosing a Social Share Image
Social Media
How to Choose a Social Share Image Step 1: Go to Site Summary Step 2: Click the Marketing Kit tab Step 3: Scroll to the Social Media Flyer Tiles section…
How to Share a Property to Social Media Step 1: Go to Site Summary Step 2: Click the Site Activation tab Step 3: Scroll to Social Media section Step 4:…
Our TourFactory Marketing Kits now include ready-to-post Social Media Videos! The videos are automatically generated using your listing media. Pick from 12 templates and simply click an element to make an edit or swap out a photo.
Easily download these videos on your computer and mobile device.
*May not be available in all locations
How to Download and Share Social Media Videos
Step 1: Go to the Site Summary Step 2: Navigate to the Marketing Kit Step 3: Select the desired video Step 4: Click the Download button to save the video Step 5: Share the video file to social media or attach to an email
Step 1: From the Site tab at the top of the page, click the property you would like to access the social media videos for. This will take you to the Site Summary page.
Step 2: Click the Marketing Kit tab on the left-hand side.
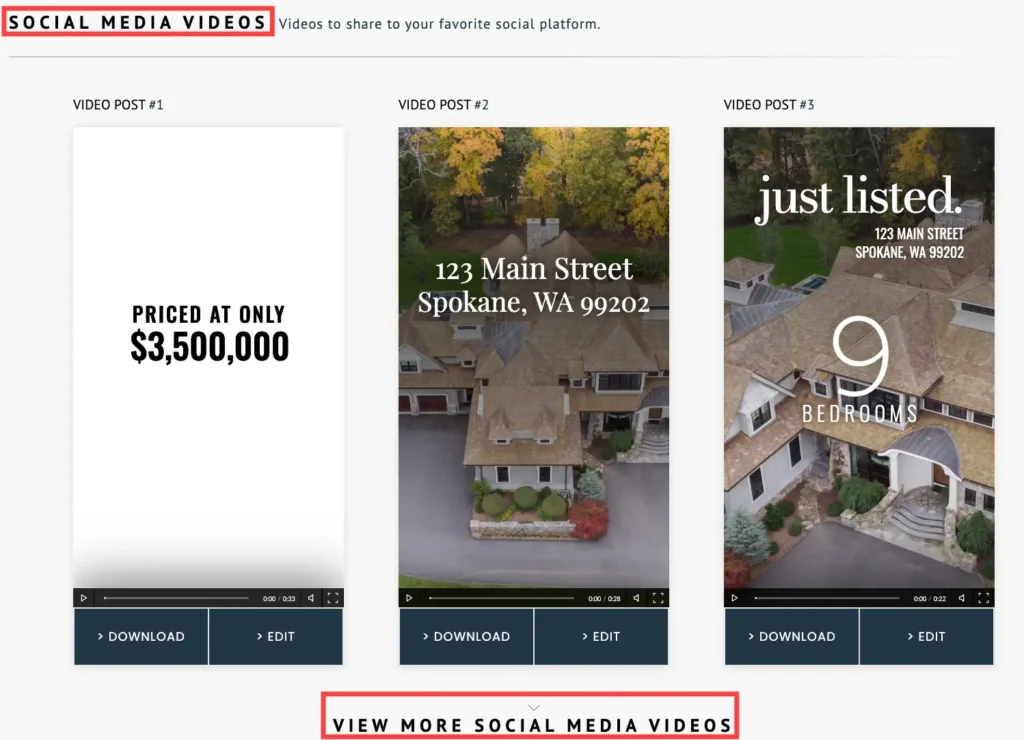
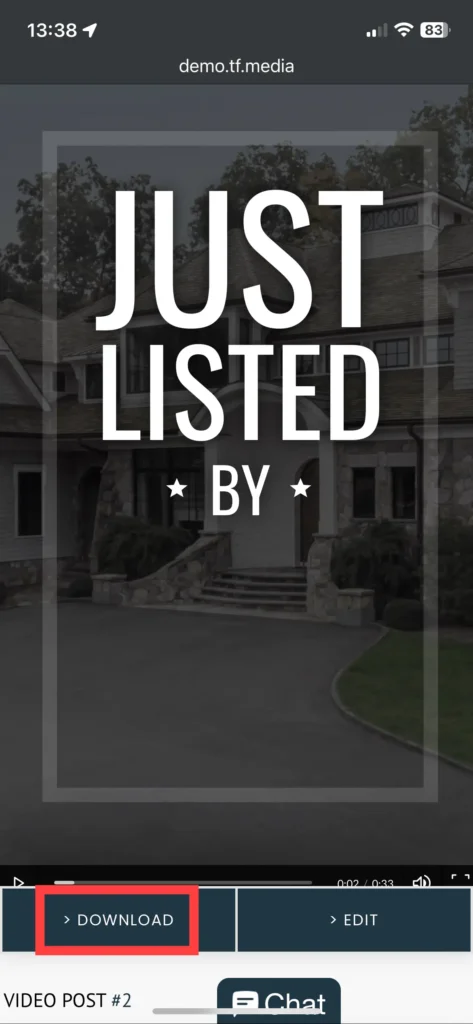
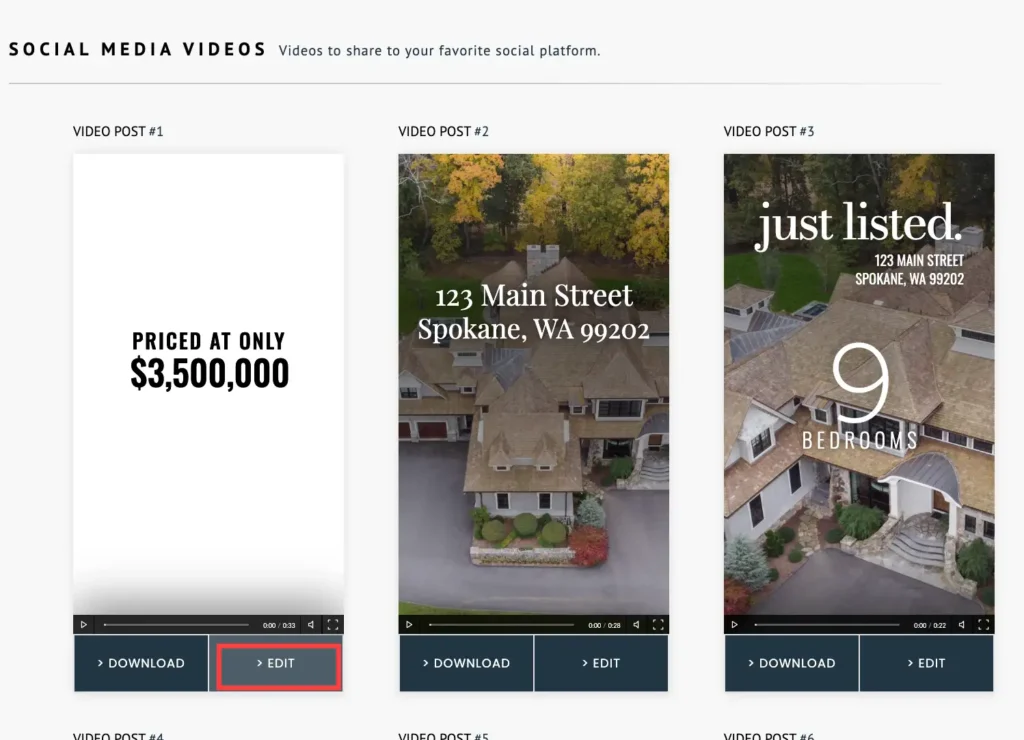
Step 3: Scroll down to the Social Media Videos section and select the video that fits your needs. To see all available templates, click the arrow above ‘View More Social Media Videos’.
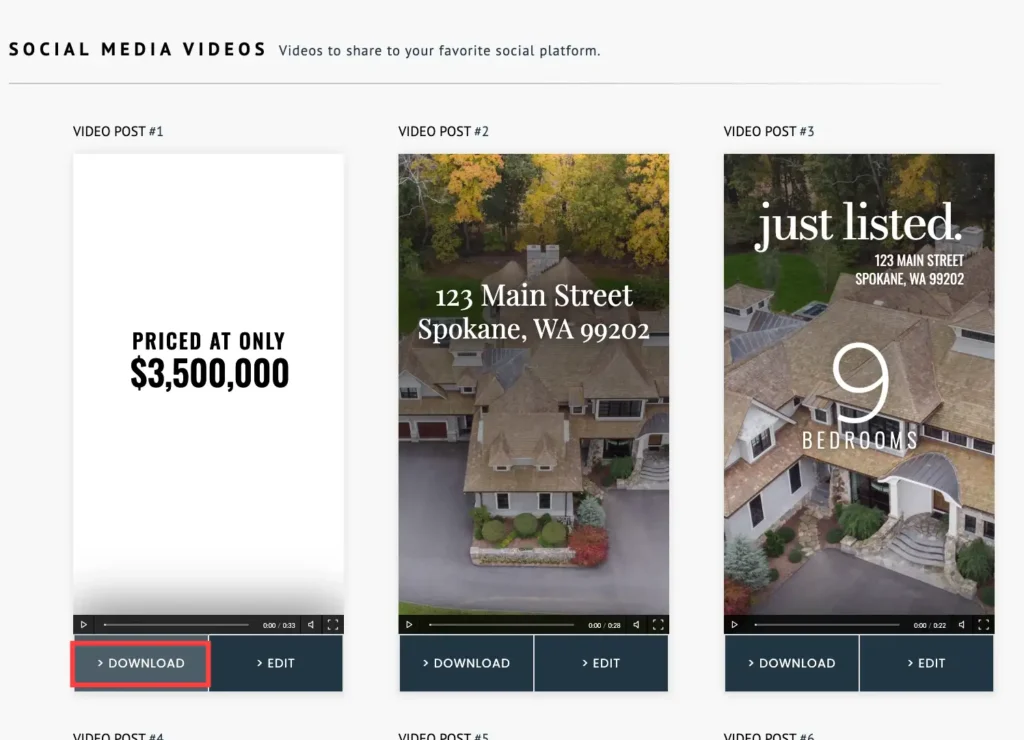
Step 4: Click the Download button to save the video mp4 file to your computer. Typically, downloads get directed to the Download folder. For more info on how to find your downloaded files on your computer, click here.
Step 5: Post the video file to social media or attach to an email to share.
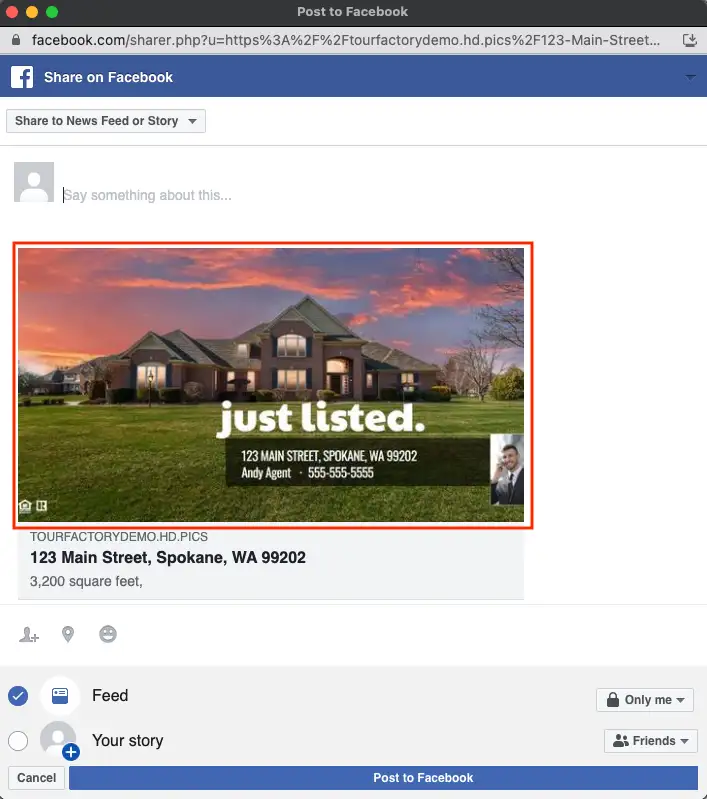
Facebook
From your Facebook homepage, click ‘Photo/video’ under ‘What’s on your mind?’
Click on ‘Add Photos/Videos’ to open the video file you’ve saved. Write in a personalized caption and select ‘Post’ when you’re ready to share.
Instagram
From your Instagram homepage, select ‘Create’ or the plus icon.
Click on ‘Select from computer’ to open the video file you’ve saved. Write in a personalized caption and select ‘Post’ when you’re ready to share.
Step-by-Step for Mobile:
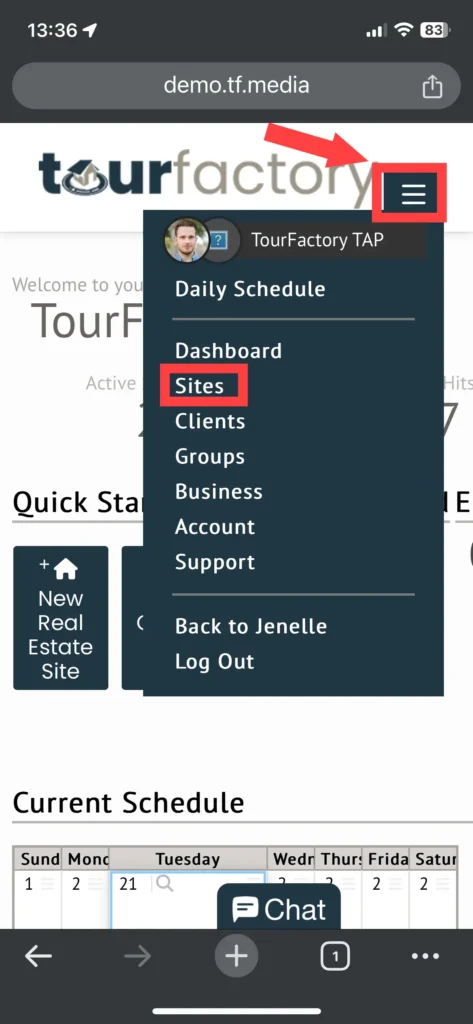
Step 1: To get to the Site Summary page, click the Menu bar icon at the top right of the page and select Sites. On the next page, click the property you would like to access the social media videos for. You may need to scroll down a bit for this.
Step 2: Click the Marketing Kit icon on the left-hand side.
Step 3: Scroll down through the Social Media Videos section and select the video that fits your needs.
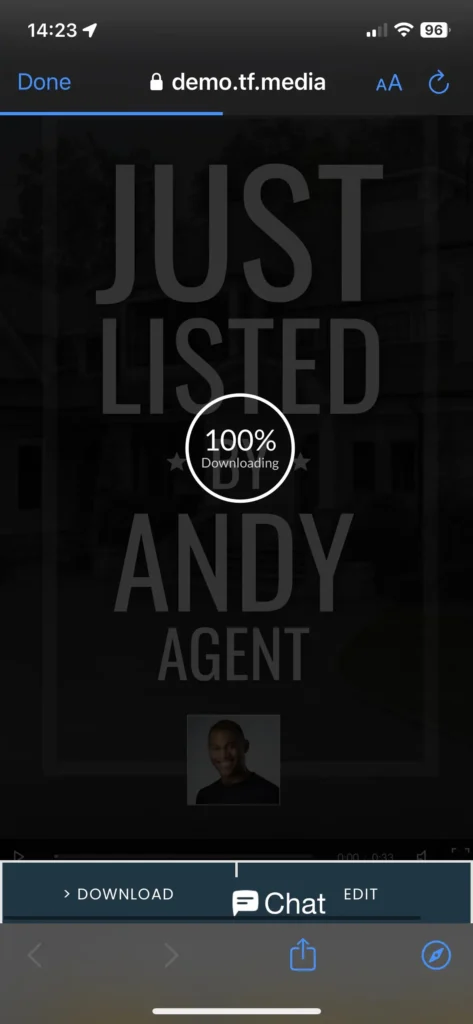
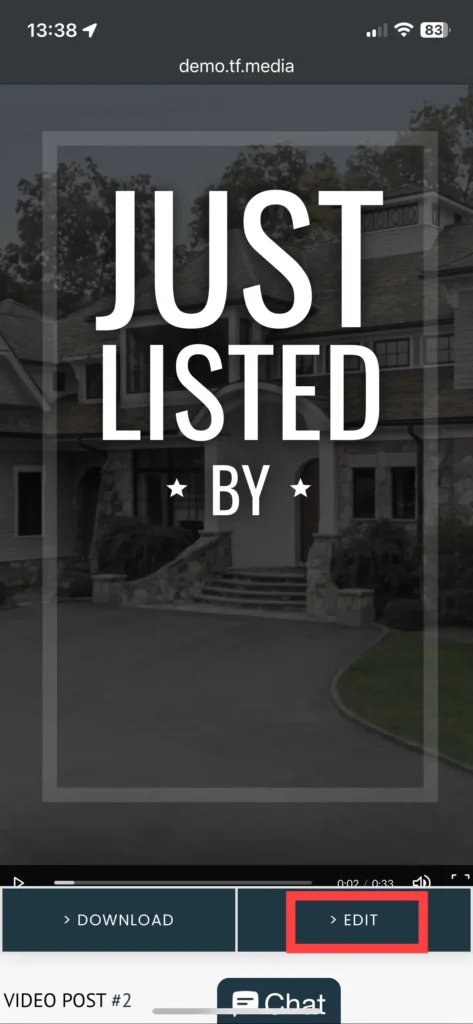
Step 4: Click the ‘Download’ button to save the video. The video may need to rebuild and take a few moments before it reaches 100%.
Step 5: Once the download finishes, the file will be accessible on the mobile device to share. See Apple and Android examples below on how to access the download:
Apple – Downloaded Files
*On Chrome browser
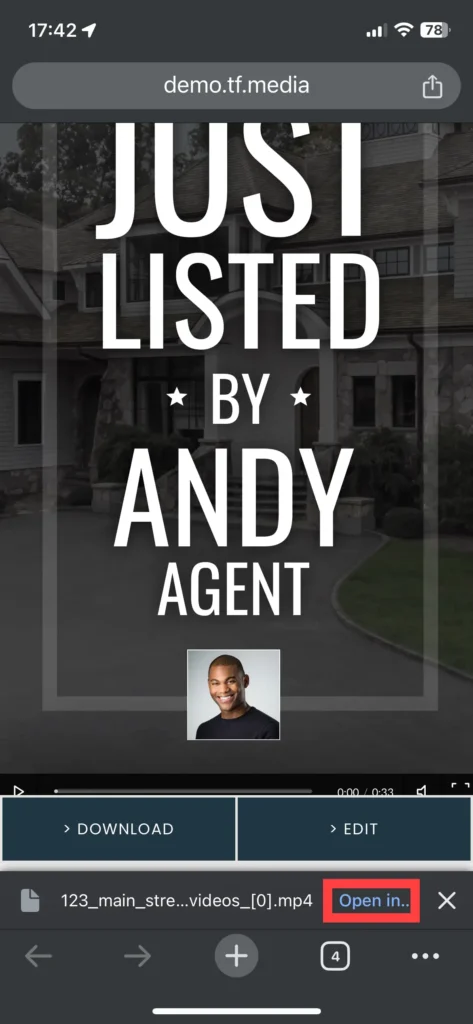
After the download finishes, a banner will display at the bottom of the screen. Click the ‘Download’ link.
Then click the ‘Open in…’ link.
Share directly from the menu below to post to social media or attach to an email.
Android – Downloaded Files
*On Chrome browser
After the download finishes, a banner will appear near the top of the screen. Select ‘Open’.
The video will open and you can select the Share icon to post to social media or attach to an email.
How to Edit Social Media Videos
Step 1: Go to the Site Summary Step 2: Navigate to the Marketing Kit Step 3: Select the desired video Step 4: Click on the Edit button and swap out any elements or photos Step 5: Click Save to finalize changes
Step 1: From the Site tab at the top of the page, click the property you would like to access the social media videos for. This will take you to the Site Summary page.
Step 2: Click the Marketing Kit tab on the left-hand side.
Step 3: Scroll down to the Social Media Videos section and choose which video you would like to edit. To see all available templates, click the arrow above ‘View More Social Media Videos’.
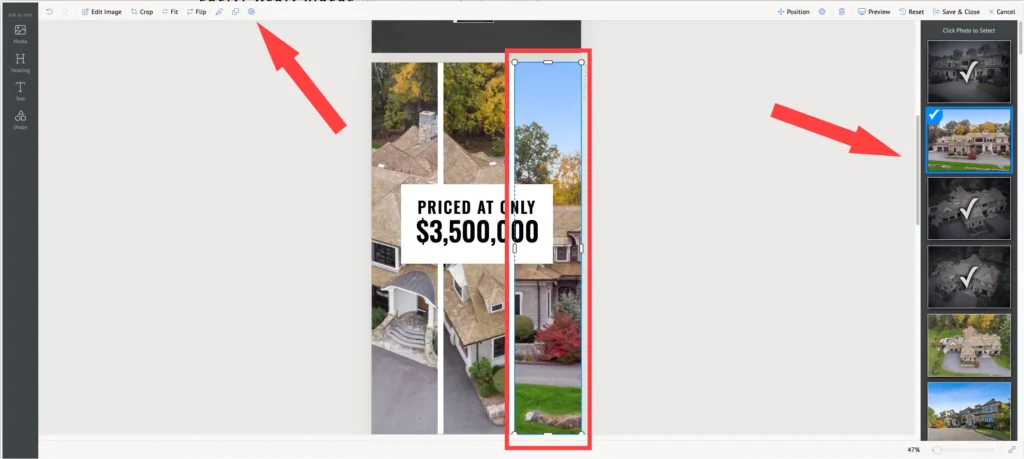
Step 4: Click on the Edit button to swap out photos and text.
Click on the element you would like to edit and make changes from the top and right side menus.
You can also add new elements from the menu on the left side.
Step 5: Once you’ve finished your edits, click ‘Save & Close’ in the top right. On this menu, you can also Preview the video or Reset any changes you’ve made.
Step-by-Step for Mobile:
Step 1: To get to the Site Summary page, click the Menu bar icon at the top right of the page and select Sites. On the next page, click the property you would like to access the social media videos for. You may need to scroll down a bit for this.
Step 2: Click the Marketing Kit icon on the left-hand side.
Step 3: Scroll down through the Social Media Videos section and select the video that fits your needs.
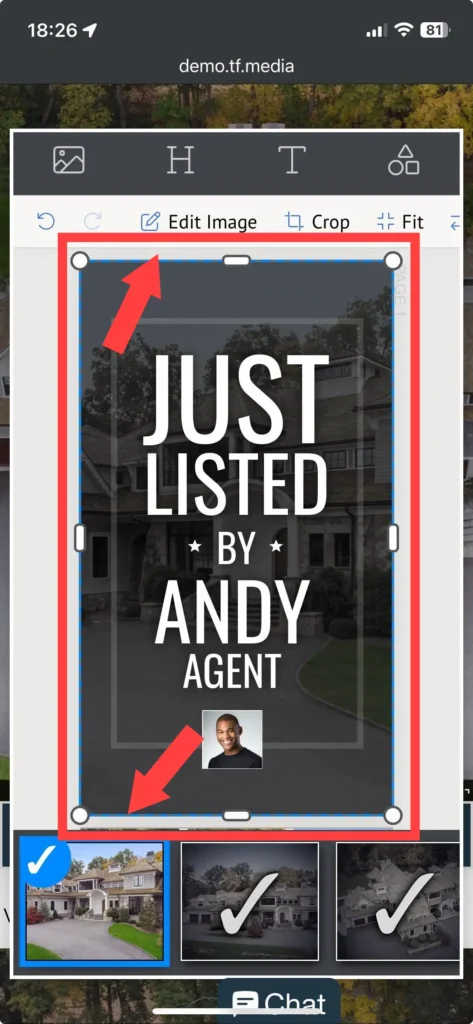
Step 4: Click on the Edit button to swap out photos and text.
Click on the element you would like to edit and make changes from the top and bottom menus.
Step 5: Click Save to finalize changes. On this menu, you can also Preview the video or Reset any changes you’ve made.
Note: if you don’t see this menu option, make sure there are no images and text selected.
Related Content
Choosing a Social Share Image
Social Media
How to Choose a Social Share Image Step 1: Go to Site Summary Step 2: Click the Marketing Kit tab Step 3: Scroll to the Social Media Flyer Tiles section…
Setting a Default Social Share Image You and your client can choose which image you would like displayed when your property website link is shared on social media. If you…
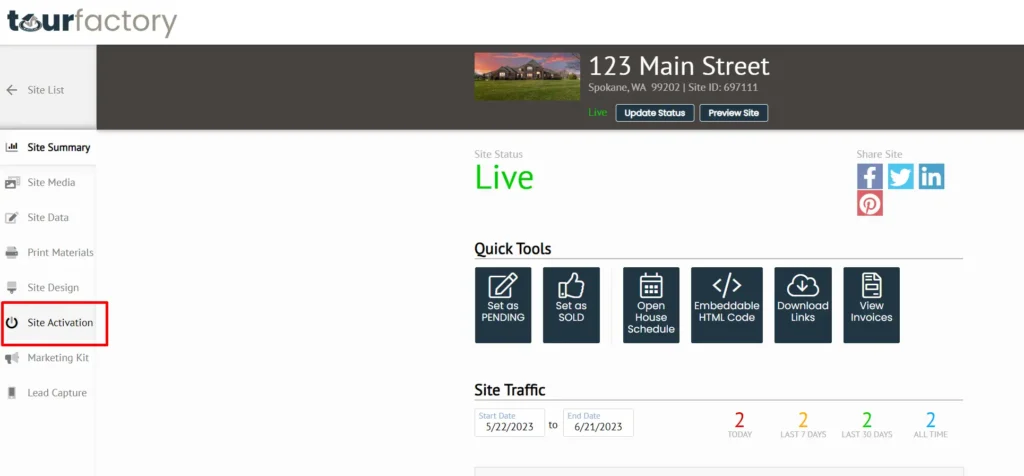
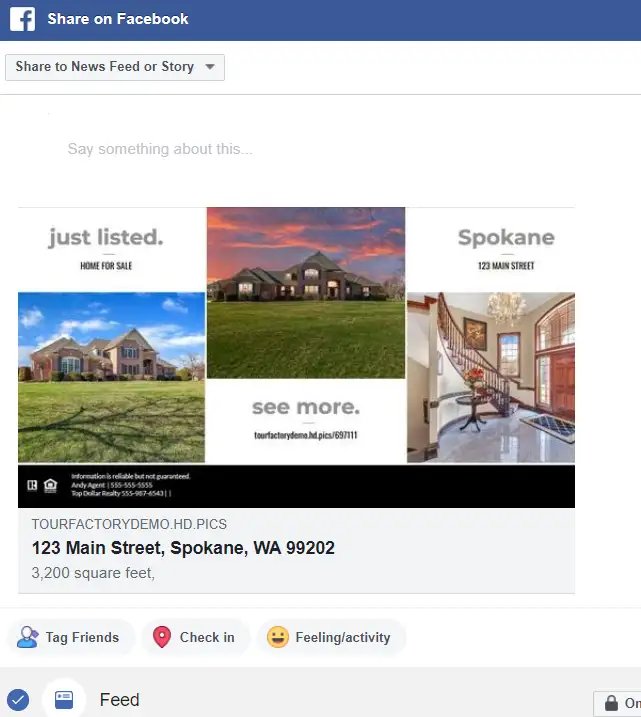
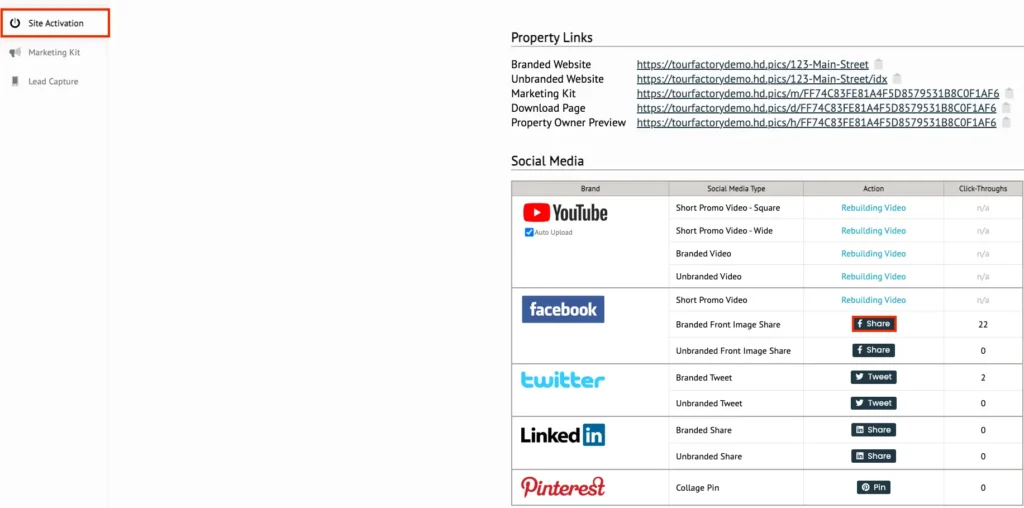
Step 1: From the Sites tab at the top of the page, click the property that you would like to share to social media. That will take you to the Site Summary page.
Step 2: Click the Site Activation tab on the left-hand side of the page.
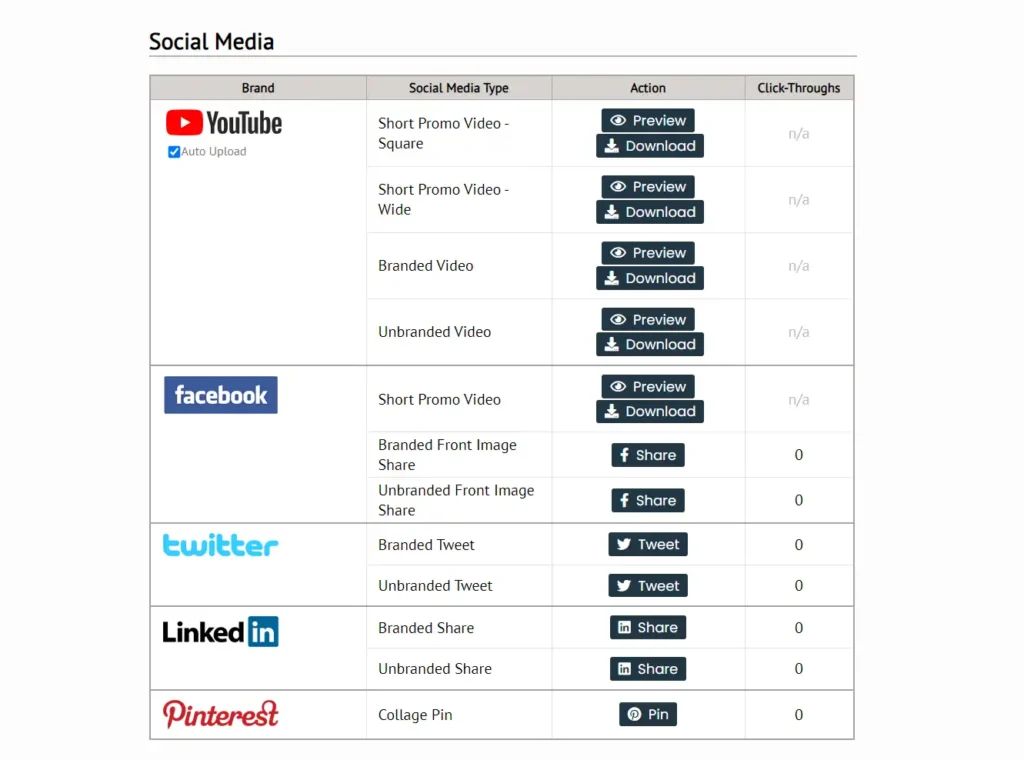
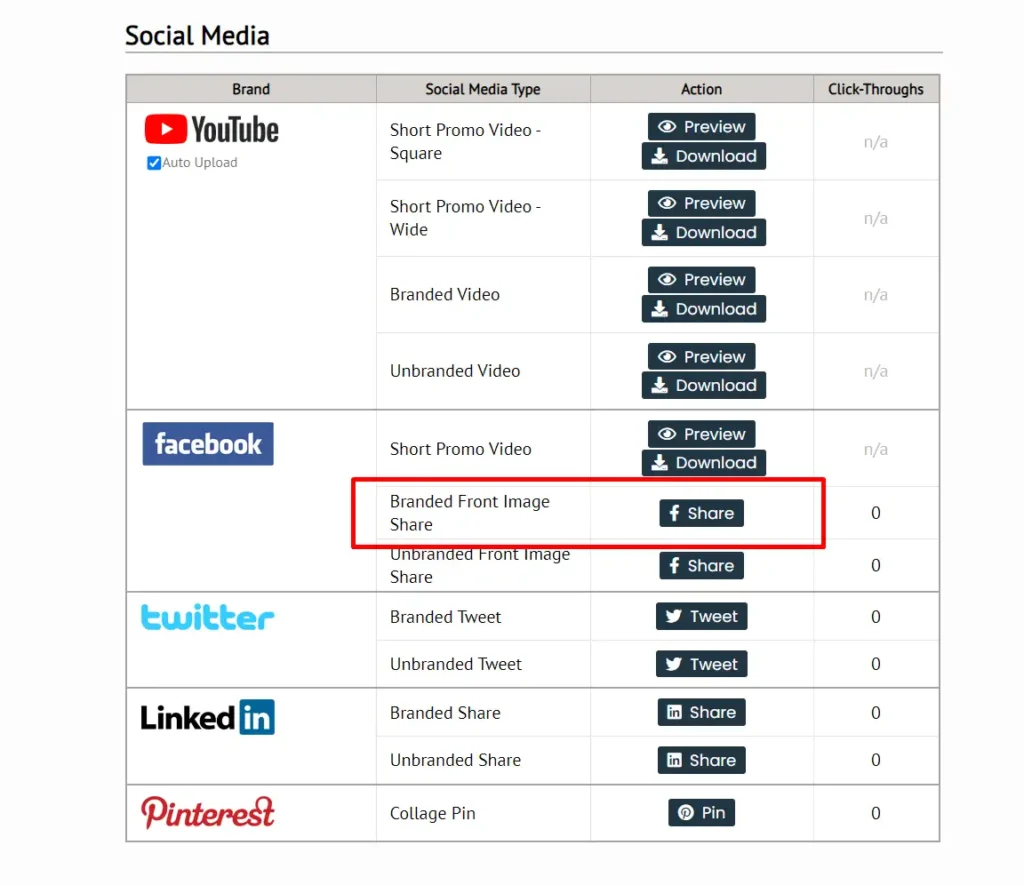
Step 3: Scroll down to the Social Media section. You will see the various social media platforms that you can share to.
Step 4: Click the “Share” button for the platform that you would like to post to. Note: you can also Preview and Download Site Videos where available.
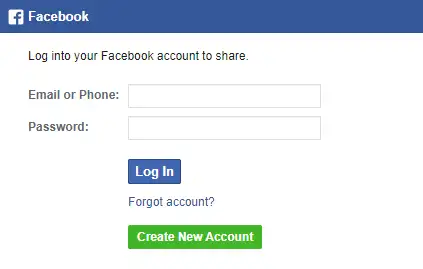
Step 5: If you are not already logged in, you will be prompted to log in to create your post.
Step 6: At this point, you can make any changes to the post if you need to.
Step 7: Once you have edited the post to your liking, click the specific post or share button of that platform. The post will appear on the social media site that you selected.
Related Content
Choosing a Social Share Image
Social Media
How to Choose a Social Share Image Step 1: Go to Site Summary Step 2: Click the Marketing Kit tab Step 3: Scroll to the Social Media Flyer Tiles section…
Setting a Default Social Share Image You and your client can choose which image you would like displayed when your property website link is shared on social media. If you…
Step 2: Click on the Marketing Kit tab on the left
Step 3: Scroll down to the Facebook Social Media Flyer Tiles and click “debug”
Step 4: Click “Debug” again on the Facebook for Developers page that opens
Step 5: See updated information on new Facebook post
View the video below for a quick how-to overview:
Step-by-Step:
Step 1: Go to the property site that is having issues when posting to Facebook.
Step 2: Click on the Marketing Kit tab on the left-hand side of the page.
Step 3: Scroll down to the Social Media Flyer Tiles section and locate the Facebook tiles. Click the “debug” hyperlink just below the Refresh button.
Step 4: This will take you to the Facebook for Developers page where you will see the property site link. Click “Debug” to the right of the property site link.
Step 5: Once you have debugged the link, start a new Facebook post and see the updated information. Note: a new post must be generated, the previously shared Facebook post cannot be edited.
Related Content
Choosing a Social Share Image
Social Media
How to Choose a Social Share Image Step 1: Go to Site Summary Step 2: Click the Marketing Kit tab Step 3: Scroll to the Social Media Flyer Tiles section…
Setting a Default Social Share Image You and your client can choose which image you would like displayed when your property website link is shared on social media. If you…
How to Share a Property to Social Media Step 1: Go to Site Summary Step 2: Click the Site Activation tab Step 3: Scroll to Social Media section Step 4:…
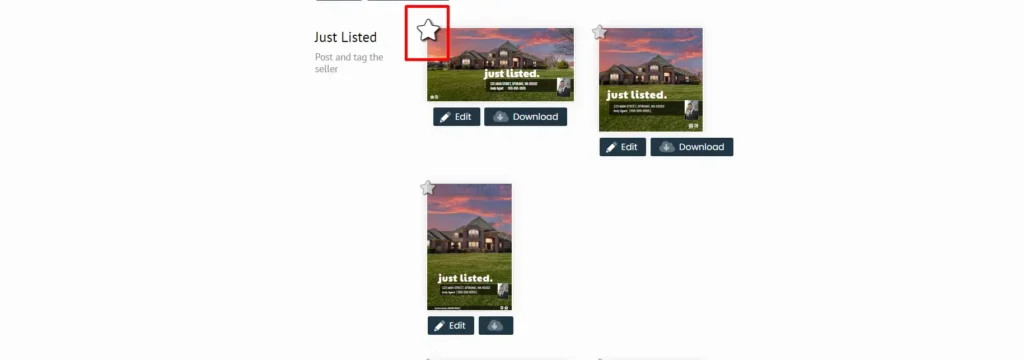
Step 3: Scroll to the Social Media Flyer Tiles section
Step 4: Click the star in the upper-left corner
Step 5: Share link to social media and see new share image reflected
Step-by-Step
Step 1: From the Sites tab at the top of the page, click the property that you would like to set a shared image for.
Step 2: Click on the Marketing Kit tab on the left-hand side.
Step 3: Scroll down to the Social Media Flyer Tiles section.
Step 4: Find the social tile that you would like to display when sharing the link to social media. Click the star in the upper left-hand corner of the social media flyer tile.
Step 5: Go to the Site Activation tab and select “Share” button for the social media platform you’d like to use. Notice that share image reflects the starred social media tile.
Related Content
Clearing Facebook Cache
Social Media
How to Clear Facebook Cache Step 1: Go to the Property site Step 2: Click on the Marketing Kit tab on the left Step 3: Scroll down to the Facebook…
Setting a Default Social Share Image You and your client can choose which image you would like displayed when your property website link is shared on social media. If you…
How to Share a Property to Social Media Step 1: Go to Site Summary Step 2: Click the Site Activation tab Step 3: Scroll to Social Media section Step 4:…